
Beginner Guide to Product Photography with Smartphone (Low Budget Setup)
Are you curious about incredible smartphone photography tricks? You’ve landed in the perfect spot today. You might think you need fancy, expensive cameras to take great photos of your products. But guess what? Your smartphone is powerful enough to create stunning images for your business or passion project. This beginner guide to product photography will show you exactly how to do it with a low budget setup.
It’s all about knowing a few simple secrets to unlock your phone’s full potential. You can create beautiful, professional-looking photos without breaking the bank. Let’s dive into making your products shine using just the device in your pocket. This guide is perfect for anyone looking into product photography with phone.
The Power of Your Pocket: Why Your Smartphone is Perfect for Product Photography
Smartphones these days have amazing cameras built right in. They are always with you, making them super convenient to use. You don’t need to carry heavy gear or learn complicated camera settings. This makes them ideal for anyone starting their journey in beginner guide to product photography.
Modern phones offer features like high resolution, great low-light performance, and even portrait modes. These features help you capture clear and beautiful images. For budget ecommerce photography, your smartphone is truly your best friend.
You can take great pictures for your online store, social media, or personal projects. Many successful small businesses started by using their phones. These mobile product photography tips will help you achieve the same results.
Your Essential Low Budget Setup for Product Photography
You don’t need a lot of money to set up a fantastic photography space. Most of what you need might already be in your home. This section focuses on a smart smartphone photography setup. We will help you create professional images without expensive equipment.
Every piece of gear we talk about here is either free or very affordable. Remember, creativity is your most important tool. Let’s gather your simple, yet effective, tools for excellent product photography with phone.
H3: Your Smartphone: The Star of the Show
Of course, your smartphone is the most important tool you have. Make sure its camera lens is super clean. Use a soft cloth to gently wipe away any dust or fingerprints. A dirty lens can make your photos blurry or hazy.
Take some time to learn about your phone’s camera app. Explore its different modes and settings. This will help you get the best out of your device for ecommerce product photography smartphone.
Many phones have a “Pro” or “Manual” mode that gives you more control. Don’t be afraid to experiment with these options. You can often adjust things like brightness and focus manually.
H3: Lighting: Your Best Friend for Great Photos
Good lighting is the single most important factor in product photography. It can make or break your photos. Luckily, the best light source is often free and readily available. This is a crucial aspect for any beginner guide to product photography.
H4: Natural Light: Free and Fantastic
The sun provides beautiful, soft light perfect for products. Find a window that gets bright, indirect sunlight. Direct sunlight can be too harsh, creating strong shadows. A cloudy day is actually perfect, as clouds act like a giant diffuser.
Place your product near the window, but not directly in the sun’s path. You want the light to gently wrap around your item. This creates a natural, inviting look for your low budget product photo.
If the window light is too strong, you can diffuse it. Hang a thin white curtain or a piece of white tracing paper over the window. This softens the light even more. Soft light reduces harsh shadows and makes your product look better.
H4: Artificial Light: When Natural Light Isn’t Enough
Sometimes, natural light isn’t available or consistent. That’s when you can use artificial lights. You don’t need fancy studio lights; simple household lamps can work wonders. A desk lamp with an LED bulb can be very effective. Look for bulbs that say “daylight” or have a color temperature around 5000K-6500K. This mimics natural light.
You can use one or two lamps, aiming them at your product. Experiment with their positions to get the best results. For budget ecommerce photography, this is a smart alternative.
To soften the light from a lamp, you can use a diffuser. A piece of white tracing paper or a clean white t-shirt taped over the lamp will work. Just be careful not to create a fire hazard with hot bulbs. LED bulbs usually stay cool enough.
H4: Reflectors: Bouncing Light Back
Reflectors are super useful for filling in shadows. They bounce light back onto your product from another direction. You can make a reflector easily with a piece of white foam board, cardboard covered in aluminum foil, or even a plain white sheet of paper. Place your reflector on the opposite side of your light source. This will lighten up any dark areas on your product.
Using reflectors is one of the top mobile product photography tips. It helps to balance the light across your item. A reflector ensures that all parts of your product are well-lit and visible. This makes your photos look more professional and polished.
H3: Backgrounds: Setting the Scene
A clean, simple background helps your product stand out. You want the focus to be entirely on your item, not on distracting elements behind it. This is a key part of any good smartphone photography setup.
H4: Simple and Clean Backgrounds
White backgrounds are very popular and look professional. You can use a large piece of white poster board, a white bedsheet, or even a roll of white craft paper. Drape it from a wall onto a table to create a seamless sweep. This means no harsh lines behind your product.
Black backgrounds can create a dramatic and luxurious feel. Grey backgrounds are neutral and versatile. Experiment with different colors to see what suits your product best. These simple options are perfect for low budget product photo.
H4: DIY Light Box: A Mini Studio
A DIY lightbox is like having a mini photo studio at home. It provides soft, even lighting from all sides. You can build one easily with a cardboard box, some white paper, and tracing paper. Cut out windows on the sides and top of a cardboard box. Line the inside with white paper. Then, cover the windows with tracing paper to diffuse light.
Place your product inside and shine your lamps through the tracing paper windows. This setup works wonders for small to medium-sized products. It ensures consistent lighting and a clean background every time. This is an excellent addition to your smartphone photography setup.
DIY Lightbox Cost Estimator
Estimate the cost of your simple DIY lightbox setup:
Estimated Total Cost: $0.00
H3: Tripod or Stabilizer: Keep It Steady
A shaky hand can ruin a great photo by making it blurry. A tripod or stabilizer keeps your phone perfectly still. This is crucial for sharp, clear images, especially in lower light. For product photography with phone, stability is key.
You don’t need an expensive tripod. A small desktop tripod designed for phones works great. You can find these for very cheap online or at electronics stores. Some even come with a remote shutter button.
If you don’t have a tripod, you can get creative. Prop your phone up against a stack of books, a mug, or anything sturdy. Just make sure it won’t fall and that your phone is perfectly still. This is an important mobile product photography tip.
H3: Editing Apps: Making Your Photos Shine
Even the best photos can benefit from a little editing. There are many free or low-cost editing apps for smartphones. These apps allow you to crop, adjust brightness, contrast, and color. They can significantly enhance your low budget product photo.
Popular free apps include Google Snapseed, Adobe Lightroom Mobile (free features are robust), and VSCO. These tools are powerful and easy to learn. They will help you fine-tune your images. A little editing makes a big difference for ecommerce product photography smartphone.
Step-by-Step: Taking Amazing Product Photos with Your Phone
Now that you have your basic setup, let’s walk through the process of taking great photos. This beginner guide to product photography will make sure you capture your products beautifully. Each step is designed to be simple and effective for your smartphone photography setup.
H3: Step 1: Preparing Your Product
Before you even think about your camera, prepare your product. Make sure it’s spotlessly clean. Wipe away any dust, smudges, or fingerprints. Use a lint-free cloth for best results. If your product is clothing, iron out any wrinkles.
Present your product in its best possible state. This initial care makes a huge difference in the final photo. A well-prepared product is halfway to a great shot.
H3: Step 2: Setting Up Your Scene
This is where all your low-budget gear comes together. Place your product on your chosen background. Position your light source (window or lamp) so it illuminates your product well. Remember the rules of soft light.
If using a reflector, position it opposite your light source. This will bounce light back onto the product, reducing shadows. Take a moment to adjust everything until it looks just right. Your smartphone photography setup is almost complete.
Think about how your product sits on the background. Does it look balanced? Is it centered if that’s what you want? Pay attention to these small details.
H3: Step 3: Camera Settings on Your Phone
Your phone’s camera app has some helpful features. Open your camera app and point it at your product. Tap on your product on the screen to set the focus. This tells your phone what to make sharp. Once you’ve tapped, you might see a square or circle indicating focus.
You can often “lock” the focus and exposure by holding your finger down on the screen. This stops the camera from refocusing or changing brightness as you move slightly. This is an essential mobile product photography tip.
Many phones also let you adjust brightness (exposure) by dragging a slider up or down after tapping to focus. Use this to make your product look bright and clear. Turn on your camera’s grid lines (often found in settings). This adds a grid overlay to your screen, which helps with composition. The grid lines help you with the “rule of thirds,” which we will discuss next.
H3: Step 4: Composition & Angles
Composition is how you arrange your product within the frame of your photo. It’s about making your photo visually appealing. For product photography with phone, good composition is crucial.
H4: The Rule of Thirds
Imagine your screen divided into nine equal squares by two horizontal and two vertical lines. The rule of thirds suggests placing your product or important elements along these lines or at their intersections. This creates a more interesting and balanced photo than just centering everything. Experiment with this simple rule to enhance your low budget product photo.
H4: Experiment with Angles
Don’t just take one shot from one angle. Try different perspectives.
- Eye-level: As if you’re looking directly at the product. This is great for showing what the product looks like in real life.
- Overhead (Flat Lay): Shooting from directly above. This works well for collections of items or food. Make sure your phone is perfectly parallel to the surface.
- Detail shots: Zoom in on unique features, textures, or branding. This helps customers appreciate the quality.
- Lifestyle shots: Show the product in use or a relevant setting. For example, a mug with coffee, or a handmade soap next to a plant. This adds context and appeal. This is great for ecommerce product photography smartphone.
H4: Use Negative Space
Negative space is the empty area around your product. It helps your product stand out and prevents the photo from looking cluttered. Don’t be afraid to have some empty space around your item. This guides the viewer’s eye directly to your product.
H3: Step 5: Taking the Shot
Once everything is set up and your composition is ready, it’s time to take the picture. Make sure your phone is absolutely still. If you have a tripod, use it. If not, brace your elbows against your body or a table. Use the timer function on your camera app. This lets you press the shutter button and then remove your hand before the picture is taken, avoiding any camera shake.
Take multiple shots. Don’t just take one photo and move on. The more photos you take, the higher the chance you’ll capture that perfect one. You can always delete the bad ones later.
Post-Processing: Making Your Photos Shine
Once you’ve taken your photos, the work isn’t quite done. Post-processing, or editing, is where you fine-tune your images. This process is essential for any beginner guide to product photography. It transforms good photos into great ones.
Even with the best setup, small adjustments can make a huge difference. Editing can correct minor flaws and enhance your product’s best features. This is especially true for ecommerce product photography smartphone.
H3: Basic Edits with Your Phone
Most editing apps, even your phone’s built-in photo editor, offer these basic tools. They are simple to use and incredibly effective. These mobile product photography tips are easy to apply.
H4: Cropping and Straightening
First, crop your photo to remove any unnecessary background elements. You want the focus entirely on your product. Make sure your product is straight and level. Use the grid lines in your editing app to align horizontal and vertical elements. A crooked photo looks unprofessional.
H4: Brightness and Contrast
Adjusting brightness makes your photo lighter or darker. Aim for a bright, clean look without making highlights too strong or shadows too dark. Contrast refers to the difference between the light and dark parts of your image. Increasing contrast can make your product “pop,” but too much can make it look unnatural. Find a balance that makes your product look vibrant.
H4: Color and Saturation
White balance adjusts the overall color cast of your photo. If your photo looks too yellow or too blue, adjust the white balance to make whites appear truly white. This is vital for showing accurate product colors. Saturation controls the intensity of colors. A slight increase can make colors richer, but be careful not to overdo it, as colors can look fake.
H3: Advanced Edits for Polished Results
These tools are often found in more advanced free apps like Snapseed or Lightroom Mobile. They offer more precise control. Using these features helps you create a truly professional low budget product photo.
H4: Selective Adjustments
Some apps allow you to adjust specific parts of your image. For example, you can brighten only your product, leaving the background as is. This helps draw even more attention to your item. This level of detail is a fantastic mobile product photography tip.
H4: Healing Brush/Spot Removal
Got a tiny dust speck on your product you missed? A healing brush tool can magically remove small imperfections. Use it sparingly to clean up any distracting elements. This helps you present a flawless ecommerce product photography smartphone image.
H4: Exporting in Correct Formats
When you’re done editing, save your photos in the correct format and size. For web use (like online stores), JPEG format is common. You’ll want a good balance between file size and image quality. Many platforms have recommended image sizes. Check those guidelines before uploading.
Advanced Mobile Product Photography Tips (Beyond the Basics)
You’ve got the basics down, now let’s explore some ways to make your photos even better. These smartphone photography tricks will elevate your product images. Moving beyond a simple beginner guide to product photography will help you stand out.
H3: Using Props Wisely
Props can add context, scale, and interest to your product photos. However, they should never distract from your main product. Choose props that are relevant and simple. For example, if you’re selling coffee mugs, a few coffee beans or a small book can work as props. If you’re selling jewelry, a small plant or a piece of silk fabric can add elegance.
Ensure props complement your product’s style and color. They should enhance the story you’re telling, not overshadow the product. Less is often more when it comes to props.
H3: Lifestyle Shots: Showing Products in Action
Lifestyle shots show your product being used in a real-world setting. These photos help customers imagine themselves using the product. If you sell handmade soap, show it in a bathroom setting with a beautiful towel. If it’s a piece of jewelry, show someone wearing it.
These shots create an emotional connection with potential buyers. They help people see the value and practicality of your item. This type of product photography with phone is very effective for engaging an audience.
You don’t need models; you can use your own hands or just set up the scene. Get creative with everyday environments. This is a powerful ecommerce product photography smartphone technique.
H3: Creating Consistent Branding
Consistency is key for a professional brand image. Try to maintain a similar look and feel across all your product photos. This means using similar lighting, backgrounds, and editing styles for all your items. If one photo is bright and airy and the next is dark and moody, it can confuse your audience.
A consistent visual style makes your brand recognizable and trustworthy. It also makes your online store or social media feed look cohesive and professional. This attention to detail elevates your low budget product photo.
H3: File Management: Staying Organized
As you take more photos, it’s easy to get disorganized. Create a system for naming and storing your photos. This could be folders for different products, dates, or types of shots. Back up your photos regularly to cloud storage or an external hard drive. Losing your photos would be a disaster.
Good file management saves you time and stress in the long run. It ensures you can always find the right image when you need it. This simple tip can make your smartphone photography setup much more efficient.
H3: Practice Makes Perfect
Photography is a skill that improves with practice. Don’t get discouraged if your first few attempts aren’t perfect. Keep experimenting with different angles, lighting setups, and editing techniques. Take lots of photos and analyze what works and what doesn’t.
Learn from others. Look at photos from brands you admire and try to understand how they achieved their look. The more you practice, the better your product photography with phone will become. Every photo is a learning opportunity.
Common Mistakes to Avoid in Product Photography
Even with the best intentions, it’s easy to fall into common traps. Knowing these pitfalls can save you a lot of time and frustration. Avoid these mistakes to ensure your low budget product photo looks its best.
- Bad Lighting: This is the biggest offender. Too dark, too harsh, or inconsistent lighting will ruin a photo. Always prioritize soft, even light.
- Cluttered Backgrounds: Distracting elements in the background pull attention away from your product. Keep your backgrounds simple and clean.
- Blurry Photos: A shaky hand or incorrect focus leads to blurry images. Use a tripod or stabilize your phone, and always tap to focus.
- Inconsistent Editing: As mentioned, varied editing styles make your brand look unprofessional. Aim for a consistent look across all your images.
- Not Cleaning the Product/Lens: Dust, smudges, or fingerprints are easily visible in photos. Always clean your product and your phone lens before shooting.
- Over-editing: While editing is important, don’t go overboard. Too much saturation, contrast, or filtering can make your product look unnatural or fake. The goal is to enhance, not transform.
- Poor Composition: Just placing a product in the center isn’t always the best. Experiment with angles and the rule of thirds to make your photos more interesting.
- One Photo Per Product: Show your product from multiple angles and highlight details. One photo rarely tells the whole story.
- Ignoring Scale: If your product’s size isn’t obvious, include a common object (like a coin or hand) in one of the shots to show its scale. This is especially useful for ecommerce product photography smartphone.
Real-World Examples & Inspiration
Seeing what others have done can spark your own creativity. There are countless examples of stunning product photography with phone online. Don’t be afraid to draw inspiration from them.
- Handmade Jewelry: Often photographed on simple textured surfaces like wood or stone, or on a plain white background with natural light. Close-ups show intricate details.
- Food Products: Often shot in flat-lay style, surrounded by ingredients or complementary dishes. Natural light makes food look delicious.
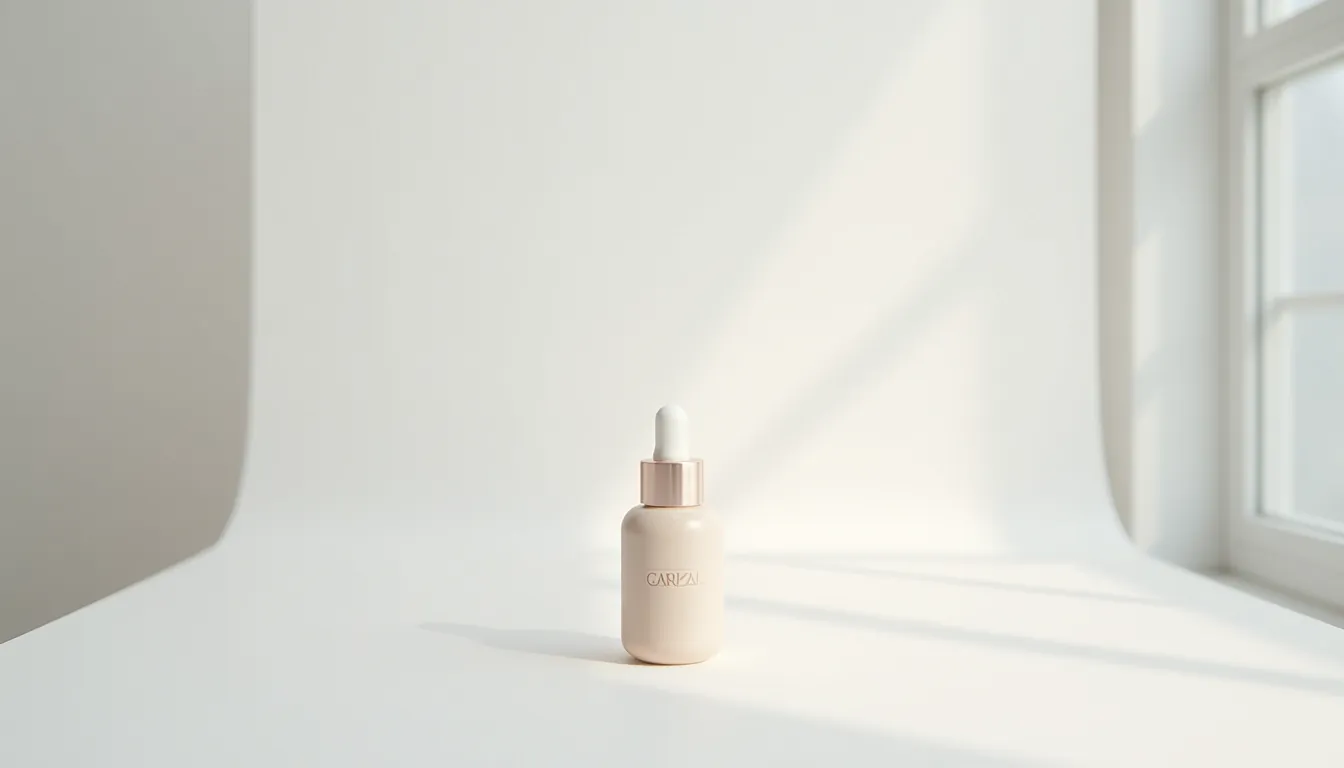
- Skincare & Cosmetics: Clean, minimalist setups with soft light highlight the product’s packaging and texture. Sometimes a single, elegant prop like a flower is used.
- Clothing & Accessories: Shot on a mannequin, flat lay, or on a person. Different angles show the fit, fabric, and design.
Look at platforms like Pinterest, Instagram, and Etsy for inspiration. Search for “mobile product photography inspiration” or “DIY product photography”. You’ll find a wealth of ideas to adapt for your own smartphone photography setup. Pay attention to lighting, background, and how products are styled.
Many small businesses showcase their products beautifully using only their phones. You can learn a lot by observing their techniques. This can help you refine your own budget ecommerce photography skills.
Frequently Asked Questions (FAQ)
Here are some common questions about beginner guide to product photography with a smartphone. These answers provide quick mobile product photography tips to common challenges. They help clarify aspects of ecommerce product photography smartphone.
H4: Can I really take professional product photos with just my phone?
Yes, absolutely! Modern smartphones have excellent cameras that can produce high-quality images. With the right lighting, background, and editing, your phone photos can look very professional. This beginner guide to product photography is designed to show you how.
H4: What’s the most important thing for good product photos?
Good lighting is by far the most crucial element. Soft, even light makes your product look its best. Natural light from a window is often the easiest and most effective. This is a top mobile product photography tip.
H4: Do I need a special app to edit my phone photos?
While your phone’s built-in editor can do basic adjustments, free apps like Snapseed or Adobe Lightroom Mobile offer more control. They allow for advanced edits like selective adjustments and spot removal. These are great for ecommerce product photography smartphone.
H4: How do I get a white background for my product photos?
You can use a large sheet of white poster board, craft paper, or even a clean white bedsheet. Drape it from a wall onto a table to create a seamless “sweep” with no visible horizon line. This is a simple low budget product photo solution.
H4: My photos are blurry. What am I doing wrong?
Blurry photos are usually caused by camera shake or incorrect focus. Make sure your phone is steady (use a tripod or brace it) and always tap on your product on the screen to focus before taking the shot. Using your camera’s timer can also help reduce shake. This is a fundamental product photography with phone technique.
H4: Should I use my phone’s zoom feature?
It’s generally best to avoid using your phone’s digital zoom. Digital zoom just crops into the image, making it pixelated and lower quality. Instead, physically move closer to your product to get a tighter shot. Optical zoom, if your phone has it (usually a second lens), is fine to use.
H4: How many photos should I take of each product?
Take several! Aim for different angles: a straight-on shot, an overhead shot, detail shots, and maybe a lifestyle shot. Provide enough images for customers to fully understand the product. This helps with ecommerce product photography smartphone.
H4: What’s the “rule of thirds” and why is it important?
The rule of thirds is a composition guideline that suggests placing key elements of your photo along imaginary lines that divide your image into nine equal parts. It helps create more balanced and visually interesting photos. Most phone cameras have a grid setting to help you visualize this. It’s an easy smartphone photography trick.
H4: Is it better to shoot in portrait or landscape mode?
It depends on your product and where the photo will be used. Many online platforms prefer square or vertical (portrait) images. Experiment with both to see what highlights your product best.
H4: How can I make my product colors look accurate?
Ensure your white balance is correct during editing. Also, use consistent, good quality lighting (like natural daylight or “daylight” LED bulbs). Poor lighting can distort colors. This is crucial for ecommerce product photography smartphone where color accuracy is vital.
Conclusion
You now have a complete beginner guide to product photography right at your fingertips. See, you don’t need expensive gear to create stunning product photos. Your smartphone, some simple household items, and a bit of creativity are all you need. With these smartphone photography tricks, you’re well-equipped.
Remember to prioritize good lighting, a clean background, and a steady shot. Don’t be afraid to experiment with different angles and compositions. And always, always take the time to clean your product and your phone’s lens. This ensures a fantastic low budget product photo.
With practice and these mobile product photography tips, you’ll be taking professional-looking photos in no time. Your online store will shine, and your products will stand out. So grab your phone and start creating amazing ecommerce product photography smartphone images today!


Leave a comment