
Beginner Guide to Product Photography: Tools, Lighting & Editing Tips for Ecommerce
Ready to make your products shine online? You’ve come to the right place! This ultimate beginner guide to product photography will show you how to take amazing pictures for your online store. Forget needing fancy, pro photography tools right away; we’ll start simple and build your skills.
Your online store needs great pictures to grab attention and convince customers to buy. Clear, bright, and beautiful photos are like a friendly handshake to your customers. They help people trust your brand and understand exactly what they’re getting.
H2: Why Great Product Photos Are Your Secret Sales Weapon
Imagine you’re shopping online for a new mug. One store shows a blurry, dark photo of a mug sitting on a messy table. Another store has a bright, clear picture of the mug from different angles, showing its texture and size. Which mug would you feel more confident buying?
Good product photos aren’t just pretty; they sell. They build trust, reduce questions, and make your products look more valuable. This beginner guide to product photography will help you achieve just that.
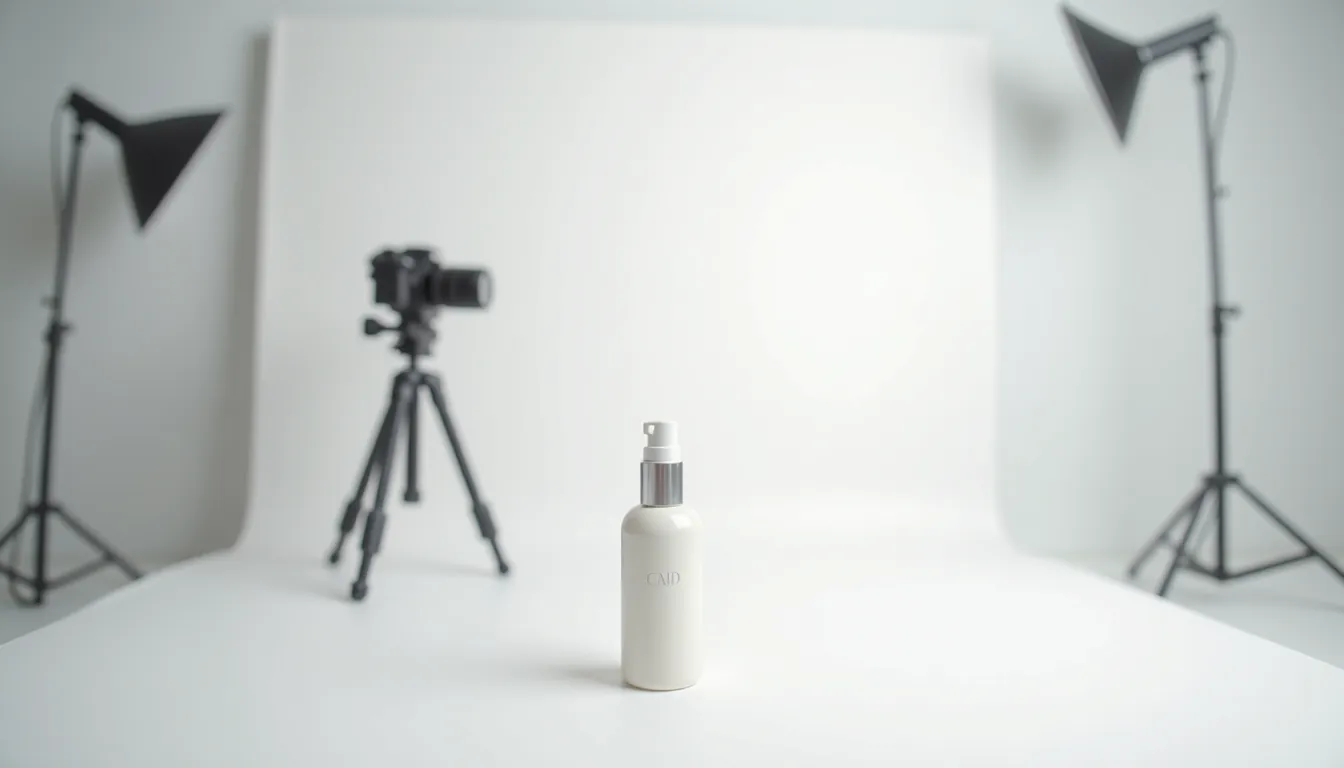
H2: Getting Started: Your Essential Product Photography Equipment
You don’t need a huge budget to start taking great product photos. Many ecommerce product photography tools are already at your fingertips, or they can be bought quite cheaply. Let’s look at the basic product photography equipment you’ll need.
H3: Your Camera: Phone vs. Dedicated Camera
You probably already own one of the best tools: your smartphone. Modern smartphones have amazing cameras that are perfect for beginners. They are easy to use and can take really high-quality pictures.
If you’re serious about growing your business, you might consider a DSLR or mirrorless camera later. These cameras offer more control and better image quality in different situations. For now, your phone is an excellent starting point for your beginner guide to product photography journey.
H3: The Unsung Hero: A Tripod
A tripod is one of the most important pieces of ecommerce photography gear you can buy. It holds your camera perfectly still, preventing blurry photos. Even the tiniest wobble from your hand can make a picture look soft.
Using a tripod also means you can keep your camera in the exact same spot for many shots, ensuring consistency. This is super helpful when you need multiple angles of the same product. You can find affordable phone tripods online or at electronics stores.
H3: Lighting: The Most Important Ingredient
Good lighting is the absolute key to amazing product photos. It can make a cheap item look expensive and an expensive item look cheap if done wrong. Don’t worry, you don’t need fancy studio lights to start.
We’ll talk more about natural and artificial lighting setups very soon. For now, remember that light truly changes everything in photography. It’s crucial for your beginner guide to product photography success.
H3: Backgrounds: Keep It Clean and Simple
What’s behind your product matters a lot. A clean, simple background helps your product stand out and prevents distractions. Most often, a plain white or light gray background works best for ecommerce.
You can use a large sheet of white paper, poster board, or even a white bedsheet. For a professional look, consider buying a photography backdrop sweep. These are inexpensive and create a seamless background curve.
H3: Reflectors: Bouncing Light Just Right
A reflector is a simple tool that bounces light onto your product. This helps to fill in dark shadows and make your product look brighter all around. You can buy foldable reflectors for very little money.
Even a piece of white foam board or aluminum foil can work as a reflector. Just position it opposite your main light source to bounce light back onto your product. It’s a clever piece of product photography equipment.
H3: Props: Adding Story (Carefully!)
Props are extra items you place in your photo to add context or style. For example, a coffee cup next to a book shows its scale and suggests a cozy reading moment. Use props sparingly so they don’t overpower your product.
Choose props that match your product’s style and your brand’s look. They should enhance the product, not distract from it. Think about the story you want to tell with your picture.
H3: Light Tent or Light Box: An Easy Studio Solution
A light tent, also known as a light box, is a fantastic ecommerce photography gear item for small products. It’s a fabric box with translucent sides that diffuse light from all directions. This creates soft, even lighting and reduces harsh shadows.
Many light tents come with built-in LED lights and different colored backgrounds. They are an affordable way to get professional-looking photos quickly. They are especially helpful for jewelery, electronics, and other small items.
H3: Diffusers: Softening Harsh Light
A diffuser is anything that spreads out and softens light. Think of it like a cloudy day, where the clouds act as a giant diffuser for the sun. Harsh light can create strong, unflattering shadows.
You can use a sheer white curtain, a piece of white fabric, or even a specialized photography diffuser. Placing a diffuser between your light source and your product will create much softer, more appealing light. This is a simple but powerful technique for your beginner guide to product photography.
H2: Mastering Lighting for Stellar Product Shots
As we mentioned, lighting is everything. It can make or break your product photos. Let’s dive deeper into how to use light effectively, an essential part of any beginner guide to product photography.
H3: Natural Light Setup: Using the Sun’s Power
Natural light is free, beautiful, and often the best choice for beginners. Find a large window that gets indirect sunlight. Direct sunlight can be too harsh and create strong shadows.
Place your product near the window, but not directly in the sun’s path. You want the soft, diffused light. Use a reflector (white foam board!) on the side opposite the window to bounce light back onto your product. This fills in shadows and makes your product glow.
H4: Tips for Natural Light:
- Time of Day: The “golden hour” (early morning or late afternoon) offers warm, soft light if shooting outdoors. Indoors, bright overcast days are perfect as the clouds act as a natural diffuser.
- Avoid Direct Sun: Direct sunlight creates harsh shadows and can make colors look blown out. Always look for indirect light.
- Rotate Your Product: Turn your product to see how the light falls on it from different angles. Experiment to find the most flattering look.
H3: Artificial Light Setup: When the Sun Isn’t Enough
Sometimes, natural light isn’t available or isn’t consistent enough. That’s where artificial lighting comes in. Don’t worry, you don’t need expensive studio strobes.
H4: Budget-Friendly Artificial Lights:
- Desk Lamps: Regular desk lamps with daylight-balanced LED bulbs can work in a pinch. You’ll need at least two, and they’ll need diffusers.
- LED Panels: Affordable LED light panels are great because they stay cool and offer consistent light. Look for ones with adjustable brightness.
- Ring Lights: Often used for videos and selfies, ring lights can provide soft, even frontal lighting for smaller products.
H4: Using Softboxes and Diffusers with Artificial Light:
Artificial lights, especially bare bulbs, can be very harsh. You need to soften them. A softbox is an enclosure that goes over a light, making the light source much larger and softer. This creates beautiful, even illumination.
If you don’t have a softbox, you can create DIY diffusers. Place a sheet of white translucent fabric or parchment paper between your light source and your product. This spreads out the light and creates softer shadows.
H4: Light Direction: Where to Put Your Lights
- Key Light: This is your main light source. Place it slightly to the side and in front of your product. This creates shape and dimension.
- Fill Light: This light reduces the shadows created by the key light. Place it opposite the key light, or use a reflector. It should be less powerful than your key light.
- Backlight: Sometimes, a light placed behind the product can create a nice rim of light, separating it from the background. Use this sparingly to avoid washing out your product.
Remember, the goal is to make your product look clear, vibrant, and true to life. Experimentation is key to understanding how different light setups affect your product. This foundational knowledge is crucial for any beginner guide to product photography.
H2: Setting Up Your Product Photography Studio (Even a Small One!)
You don’t need a huge room to create a functional photo studio. A corner of a room, a table by a window, or even a dedicated shelf can work perfectly. The trick is to be organized and consistent.
H3: Finding Your Space
Look for a spot that offers good natural light if you plan to use it. Make sure it’s an area where you won’t be easily disturbed. You want a consistent setup each time you shoot.
Clear away any clutter from the area. A clean workspace makes for a clean photoshoot. This step is about preparation, which is vital for effective ecommerce product photography tools usage.
H3: Background Setup: The Sweep
A seamless background (often called a “sweep”) is key for professional-looking product photos. You can create one easily with a roll of paper or poster board. Simply tape one end to a wall or vertical surface and let it curve down onto your table or floor.
This eliminates any harsh lines where the wall meets the table, creating a smooth, infinite-looking background. White is almost always the safest and most versatile choice for product photography equipment backgrounds.
H3: Product Placement: Center Stage
Place your product in the center of your background sweep. Make sure it’s stable and perfectly positioned. If it’s a reflective item, try to position it so your camera or reflections aren’t visible.
Think about the product’s best features. Is it a unique texture? A special detail? Position the product so these elements are highlighted.
H2: Composition and Angles: Making Your Products Pop
Once your setup is ready, it’s time to think about how you frame your product. Good composition can make your photos much more engaging. This is where your beginner guide to product photography starts to get artistic.
H3: The Rule of Thirds
Imagine your photo is divided into nine equal squares by two horizontal and two vertical lines. The Rule of Thirds suggests placing your product (or important parts of it) along these lines or at their intersections. This often creates a more balanced and interesting photo than simply centering everything.
While it’s a “rule,” it’s more like a guideline. Break it if you have a good reason! But it’s a great starting point for beginners.
H3: Different Angles for Different Stories
One photo from one angle is rarely enough for an online store. Show your product from various perspectives to give customers a complete view.
H4: Common and Effective Angles:
- Eye-Level: As if someone is looking directly at the product. This is a natural and familiar view.
- Top-Down (Flat Lay): Perfect for showing multiple items together, or the contents of a box. The camera is directly above the product.
- 45-Degree Angle: A common and flattering angle that shows depth and multiple sides of the product.
- Macro/Detail Shots: Get really close to show off fine details, textures, or craftsmanship. If your product has a unique stitch or a shiny emblem, show it off!
- Lifestyle Shots: Show your product in use or in a real-world setting. A necklace worn by a model, a coffee mug with a steaming drink. This helps customers imagine owning and using the product.
H3: Showing Scale and Context
Sometimes, photos need to tell customers how big or small an item is. You can do this by placing a common object next to your product (like a coin, a hand, or a ruler). Lifestyle shots also help show scale.
Context helps customers understand the product’s purpose. A chopping board with fresh vegetables on it tells a different story than a bare board.
H3: Consistency Across Your Store
Try to maintain a consistent style across all your product photos. This means similar lighting, backgrounds, and general angles. A consistent look makes your store appear more professional and trustworthy. This attention to detail is part of effective ecommerce product image optimization.
H2: Taking the Shot: Camera Settings for Beginners
Even with your smartphone, understanding a few basic camera settings can drastically improve your photos. Don’t be afraid to dive into your camera app’s “Pro” or “Manual” mode.
H3: Focus: Sharpness is Key
Your product must be in sharp focus. Blurry photos are a quick way to lose a sale. On a smartphone, you usually tap on your product on the screen to set the focus. Make sure the little focus box is over your product.
If your camera has a manual focus option, practice using it. This gives you precise control over what is sharp and what is not.
H3: Exposure: How Bright or Dark Your Photo Is
Exposure refers to how much light reaches your camera’s sensor. It determines if your photo is too bright (overexposed) or too dark (underexposed).
H4: The Exposure Triangle (Simplified):
- ISO: This controls your camera’s sensitivity to light. For product photography, always try to use the lowest ISO possible (like 100 or 200). Higher ISOs introduce “noise” or graininess into your photos, especially in low light.
- Aperture (f-stop): This controls how much of your photo is in focus (depth of field). A small f-number (like f/1.8 or f/2.8) means only a small part of your photo will be sharp, great for blurring backgrounds. A large f-number (like f/8 or f/11) keeps more of your photo sharp, which is often better for showing your entire product in focus.
- Shutter Speed: This controls how long your camera’s shutter stays open to let in light. Since your product is still and you’re using a tripod, you can use a slower shutter speed (e.g., 1/30s or even slower) to let in more light without blur. If you were shooting handheld, you’d need a faster shutter speed.
For beginners, especially with a phone, focus on getting your subject sharp and making sure the photo isn’t too dark or too bright. Your phone’s auto mode usually does a good job, but learn to adjust exposure compensation (often a sun icon or +/- slider) if needed.
H3: White Balance: True Colors
White balance ensures that the colors in your photo are accurate and not too warm (orange) or too cool (blue). Different light sources (sunlight, fluorescent bulbs, LED lights) have different “color temperatures.”
Most cameras have automatic white balance (AWB), which works well most of the time. However, if your white background looks yellowish or bluish, you might need to adjust it. Look for white balance presets like “Daylight,” “Cloudy,” or “Tungsten” in your camera settings. This will help you get accurate colors, which is crucial for ecommerce product image optimization.
H2: The Magic Touch: Photo Editing for Ecommerce
Taking the photo is only half the job. Photo editing for ecommerce is where you polish your images and make them truly pop. It’s like putting the final touches on a masterpiece. Don’t worry, you don’t need to be a graphic design wizard.
H3: Why Editing is Crucial for Online Sales
Editing helps correct minor imperfections, enhance colors, and ensure consistency across your product range. It makes your products look professional and inviting. Unedited photos often look dull or simply not as good as they could be.
Good product image editing tips include ensuring your product looks exactly as it does in real life. No surprises for the customer!
H3: Basic Adjustments: Your Everyday Editing Toolkit
Every editing software, whether free or paid, will have these basic tools. Mastering them is essential for photo editing for ecommerce.
H4: Crop and Rotate: Straighten Things Up
- Crop: Get rid of unnecessary background space. Frame your product nicely, often leaving a little space around it.
- Rotate/Straighten: Make sure your product is perfectly straight. A slightly crooked photo looks unprofessional.
H4: Exposure and Contrast: Brightness and Pop
- Exposure: Adjust this to make your photo brighter or darker. You want it just right, so details are clear but not washed out.
- Contrast: This enhances the difference between the light and dark parts of your photo. More contrast can make a photo look punchier, but too much can lose detail.
H4: White Balance and Color Correction: True Colors
- White Balance: As discussed, this ensures your whites are truly white and other colors are accurate. Adjust if your photo has a color cast.
- Color Correction (Saturation/Vibrance): Saturation makes colors more intense. Vibrance increases the intensity of muted colors without over-saturating already bright ones. Use these sparingly to make colors pop without looking fake.
H4: Highlights and Shadows: Bringing Out Details
- Highlights: These are the brightest parts of your image. Reducing highlights can bring back detail in areas that are too bright.
- Shadows: These are the darkest parts. Increasing shadows can reveal details in dark areas, making your product look less “muddy.”
H4: Sharpness: Making It Crisp
This tool enhances the edges in your photo, making it look crisper. Don’t overdo it, or your photo will look grainy and unnatural. A little sharpening goes a long way.
H3: Removing Backgrounds: Focus on the Product
For many online marketplaces like Amazon or Etsy, a pure white background is often required. Learning to remove backgrounds is a powerful product image editing tip.
Many tools (even free ones) now offer AI-powered background removal. This automatically detects your product and isolates it from the background. You can then replace the background with pure white or a transparent layer.
H3: Retouching: Cleaning Up Imperfections
Your product might have a tiny speck of dust, a small scratch, or a fingerprint. Retouching tools (like a “spot healing brush” or “clone stamp”) allow you to subtly remove these imperfections. This makes your product look perfect and brand new.
Be careful not to over-retouch and make your product look artificial. The goal is perfection, not a plastic toy.
H3: Batch Editing: Saving Time
If you have many similar products, batch editing is a lifesaver. This means applying the same edits (like exposure adjustments, cropping, or even watermarks) to multiple photos at once. It ensures consistency and saves you hours of work. Most professional editing software has this feature. This is a critical element of efficient ecommerce product image optimization.
H2: Recommended Editing Software: Tools for Every Budget
You don’t need to spend a fortune on software. There are many great options for photo editing for ecommerce.
H3: Free and Easy-to-Use Tools
- Canva (Web/Mobile): Excellent for basic edits, creating banners, and even background removal. Very user-friendly. Visit Canva for more information.
- GIMP (Desktop): A powerful, open-source alternative to Photoshop. It has a steeper learning curve but can do almost anything Photoshop can. You can download it from GIMP.org.
- Mobile Editing Apps (Snapseed, Adobe Lightroom Mobile, PicsArt): These apps offer surprisingly powerful editing features right on your phone. Perfect for quick edits on the go.
- Remove.bg (Web): Fantastic for quickly removing backgrounds from images. Just upload your photo and download the transparent version. Check it out at Remove.bg.
H3: Paid and Professional Tools
- Adobe Lightroom (Desktop/Mobile): Industry-standard for photo organization and editing. Great for batch editing and color correction. It’s a subscription service.
- Adobe Photoshop (Desktop): The ultimate image manipulation tool. If you need complex background removal, detailed retouching, or advanced graphics, Photoshop is the go-to. Also a subscription.
- Affinity Photo (Desktop): A one-time purchase alternative to Photoshop, offering similar powerful features. It’s a great value. Learn more at Affinity Photo.
For a beginner guide to product photography, start with free tools. Once you understand the basics and your needs grow, then consider investing in professional software.
H2: Ecommerce Product Image Optimization: Making Your Photos Load Fast
You’ve taken stunning photos and edited them beautifully. Now, you need to make sure they load quickly on your website. Slow-loading images can frustrate customers and make them leave your site. This step is just as important as the photography itself for ecommerce product image optimization.
H3: File Formats: Choose Wisely
The file format you choose affects image quality and file size.
- JPG (JPEG): Best for most product photos with lots of colors and smooth gradients. It’s a “lossy” format, meaning it compresses the image by discarding some data, which reduces file size but can slightly reduce quality if over-compressed.
- PNG: Best for images with transparency (like logos or products with no background) or sharp lines/text. It’s a “lossless” format, meaning no data is lost during compression, but file sizes are usually larger than JPGs.
- WebP: A newer format developed by Google that offers superior compression for both lossy and lossless images, resulting in smaller file sizes than JPG or PNG with comparable quality. Many modern browsers support it, and it’s becoming a standard for web optimization. Consider converting your images to WebP for best performance.
H3: Image Dimensions and Resolution: Right Size, Right Quality
You don’t need a super-high-resolution image (like 6000 pixels wide) for your website. Most ecommerce platforms recommend image widths between 1000-2000 pixels. Check your platform’s guidelines.
A 72 DPI (dots per inch) resolution is standard for web images. Don’t worry about DPI too much; focus on the pixel dimensions. Larger dimensions mean larger file sizes, even if the DPI is the same. Resizing your images to the recommended dimensions before uploading is a key ecommerce product image optimization strategy.
H3: Compression: Shrink Without Losing Quality
Image compression reduces the file size of your photos. There are many online tools and software plugins that can compress your images without noticeably reducing quality.
H4: Popular Compression Tools:
- TinyPNG / TinyJPG (Web): These websites offer excellent lossy compression for PNG and JPG files. Just drag and drop your images. You can find them at TinyPNG.
- ImageOptim (Mac) / Caesium (Windows): Desktop applications for more control over compression.
- Shopify/WooCommerce Plugins: Many ecommerce platforms have built-in image optimization or offer plugins/apps that do it automatically when you upload.
Always compress your images before uploading them to your website. This is one of the most impactful ecommerce product image optimization steps you can take.
H3: Alt Text: Helping Search Engines and Accessibility
While not directly about image size or quality, adding “alt text” (alternative text) to your images is vital for SEO and accessibility. Alt text describes your image for visually impaired users and helps search engines understand what your image is about.
Use descriptive keywords in your alt text. For example, instead of “image1.jpg,” write “Blue ceramic coffee mug with ergonomic handle.” This boosts your ecommerce product image optimization.
H3: Lazy Loading: Speeding Up Initial Page Load
Lazy loading is a technique where images outside the user’s current view are only loaded when they scroll down to them. This dramatically speeds up the initial loading time of your web pages. Many modern websites and ecommerce platforms automatically implement lazy loading, or you can enable it through plugins.
H2: Advanced Tips for When You’re Ready
Once you’ve mastered the basics of this beginner guide to product photography, you might want to explore more advanced techniques.
H3: 360-Degree Product Photography
Some products benefit from a full 360-degree view. This allows customers to spin the product and see it from every angle. This usually requires specialized turntables and software, but it can significantly enhance the customer experience.
H3: Product Videos
Short videos showing your product in action can be incredibly engaging. A video of a bag being opened, a piece of jewelry sparkling, or clothes being worn can answer questions and build excitement that static photos can’t.
H3: Hiring a Professional
If your business grows and you have a budget, consider hiring a professional product photographer. They have specialized equipment, skills, and an eye for detail that can take your product imagery to the next level. This frees up your time to focus on other aspects of your business.
H2: Common Mistakes to Avoid in Your Product Photography Journey
Even with the best intentions, beginners can fall into common traps. Being aware of these will help you produce better images.
H3: Bad Lighting
The number one mistake! Photos that are too dark, too bright, or have harsh, unflattering shadows immediately look unprofessional. Always prioritize good, soft, even lighting.
H3: Cluttered or Distracting Backgrounds
A messy background pulls attention away from your product. Keep it clean, simple, and consistent. Your product should always be the star.
H3: Out-of-Focus Shots
If your product isn’t sharp, the photo is unusable. Always double-check your focus before and after you take the shot. Use a tripod to help prevent blur.
H3: Inconsistent Style and Angles
Having wildly different photo styles across your products makes your store look unorganized. Strive for consistency in lighting, background, and general angles.
H3: Not Showing Enough Detail or Angles
Customers can’t touch your product online. You need to show them everything! Include close-ups, different angles, and lifestyle shots to give them a complete picture.
H3: Over-Editing
While editing is crucial, going overboard can make your product look fake or unnatural. Colors should be true to life, and retouching should be subtle.
H2: Conclusion: Your Journey to Stunning Product Photos Begins Now!
You now have a solid foundation for your beginner guide to product photography. Remember, practice makes perfect. Don’t be afraid to experiment with different setups, angles, and lighting. Start simple, use the tools you have, and continuously improve.
Great product photography is an investment in your business, and it’s a skill you can absolutely master. By focusing on your product photography equipment, understanding proper lighting, applying effective photo editing for ecommerce, and ensuring strong ecommerce product image optimization, you’re well on your way to captivating your customers and boosting your sales. Your online store deserves to shine, and now you have the knowledge to make it happen!
H2: Frequently Asked Questions (FAQ)
H3: What is the most important piece of product photography equipment?
Good lighting is arguably the most important element. You can have the fanciest camera, but without good light, your photos will suffer. A tripod comes in a close second for ensuring sharp, consistent images.
H3: Can I really use my smartphone for product photography?
Absolutely! Modern smartphones have excellent cameras capable of taking high-quality product photos, especially when paired with good lighting and a tripod. They are perfect for starting your beginner guide to product photography journey.
H3: How do I get a pure white background for my product photos?
You can achieve a pure white background by using a white paper sweep and ensuring it’s evenly lit. In post-processing, you might need to further whiten the background using editing software or even remove the background entirely.
H3: What are LSI keywords in SEO, and how did you use them?
LSI (Latent Semantic Indexing) keywords are words or phrases that are semantically related to your main topic, even if they aren’t direct synonyms. They help search engines understand the full context of your content. In this article, keywords like “product photography equipment,” “photo editing for ecommerce,” and “ecommerce product image optimization” are LSI keywords that naturally support the focus keyword “beginner guide to product photography.”
H3: How can I make my product photos load faster on my website?
To make your photos load faster, you need to optimize them. This involves choosing efficient file formats (like JPG or WebP), resizing images to appropriate web dimensions, and compressing them to reduce file size. These are critical ecommerce product image optimization steps.
H3: Do I need a professional camera for product photography?
No, especially not when you’re starting. A smartphone or a basic point-and-shoot camera can produce great results. As your business grows, you might consider investing in a DSLR or mirrorless camera for more control and higher quality.
H3: What’s the difference between a reflector and a diffuser?
A reflector bounces light back onto your product, usually to fill in shadows. A diffuser spreads out and softens harsh light, making it less direct and creating softer shadows. Both are important pieces of ecommerce photography gear.
H3: Should I use natural or artificial light?
Both have their pros and cons. Natural light is free, beautiful, and great for beginners, but it can be inconsistent. Artificial light offers more control and consistency, making it good for larger volumes of products or when natural light isn’t available. For a beginner guide to product photography, experimenting with both is recommended.
H3: What are some good product image editing tips for beginners?
Start with basic adjustments like cropping, rotating, exposure, contrast, and white balance. Focus on making your product sharp, bright, and color-accurate. Don’t over-edit; the goal is to enhance, not distort. Learning background removal is also a very useful skill.
H3: How many photos should I take of each product?
Aim for at least 3-5 photos showing different angles, details, and potentially a lifestyle shot. Provide enough visual information for customers to feel confident about their purchase. Think about what questions a customer might have and use photos to answer them.


Leave a comment